Monday, June 22, 2009

Preventing XBOX 360 RROD

The net is flooded with (horrid) information about how to fix your XBOX 360's RROD, yet I've never come across any extensive articles about preventing failure. If you are like me and have a working 360, but are worried about it, this article is definitely for you.

So, why not wait until your system RROD's to deal with it? Procedures like the "x-clamp fix" may get your system going again, but they are terrifying from an electro-mechanical standpoint. Avoiding the problem altogether is the hardware-safe and intelligent solution. Preventing overheating will take care of the majority of would-be RROD's, but there are various sources for the problem of overheating. One problem is simply poor ventilation, but a sorely overlooked issue is the poor heat sink mounting of the XBOX 360.

Poor Heat Sink Mounting

In this section I'd like to compare traditional PC CPU heat sink mounting to that of the XBOX 360. (Before I go on, this heat sink portion of the article is based upon the original 2 heat sink setup, not the 3 heat sink design that Microsoft later implemented. This modification is only recommended for the original 2 heat sink design.) In the case of the PC heat sink, there is dynamic tension from the spring clamp holding it to the CPU. What I mean by dynamic is that the tension holding this assembly together can flex and change as needed.


The XBOX 360 heat sink has a static tension holding it to the CPU/GPU. What I mean by static is the opposite of dynamic: it does not change according to need. At first glance, it appears that the PC design and the 360 design are similar, being as they both have spring mechanisms in place. However, there is a gross dissimilarity. On the 360, both the PCB and the heat sink are bolted to the metal chassis. This means any irregularity in the straightness of the chassis or the PCB will directly effect the quality of the contact between the heat sink and the CPU/GPU. Therefore the only dynamic aspect of this system is the (coincidental) flexibility of the PCB, which is not a proper source of suspension.


The key to fixing the 360 heat sink mounting scheme is to give it truly dynamic tension like that of the PC heat sink. To do this, we must free the 360 heat sink from the metal chassis. This is done simply by drilling out the screw holes in the metal chassis beneath the heat sink to prevent it from making contact with the x-clamp.


With this modification the 360 heat sink can self adjust according to heat and part irregularities rather than being held in a fixed position which will most likely not provide the proper tension necessary for efficient contact with the processor.


(Photo of one of the modified chassis areas. After the chassis modification, each screw must be reinforced with a washer to keep the x-clamp from popping off of the bare screw heads.)

Poor Ventilation

Well, we've covered the mechanical issues. What about the ventilation issues? The 360 has two "exhaust" fans. This means that rather than "blowing" air across an area, you are "pulling" it across. Well, much like the exhaust that comes out of your car, that air had to come from somewhere, right? In your car, air comes from the engine's "air intake."


In the 360, air comes from various vents in the system case. The picture below labels the intake vents.

  1. Small vent that is less than 1/4 of the length of the system (HDD covers the rest)
  2. Entire side is vented
  3. Two vent strips leading to the core of the system
  4. Two vent strips leading to the bottom of the motherboard
Many people forget that this machine is essentially a gaming PC. Any of you in that scene know how much air flow you need to adequately cool a gaming PC. The 360 clearly needs all the help it can get. Considering that side B makes up about 50% of the system's air intake, blocking that side by standing the console vertically is a glaringly bad practice.


You need to ensure ambient air flow around the whole unit. Never run it anywhere it "just fits." This is not a Nintendo product. Check out the section of your User Manual aptly titled, "Prevent the Console from Overheating":

"Do not place the console or powersupply in a confined space, such as a bookcase, rack, or stereo cabinet, unless the space is well ventilated."


A Few Final Thoughts


1.) One person has voiced concern regarding the integrity of the stock x-clamps because after removing them from their system they were able to mutilate them. I will not go on a metallurgical rant, but suffice it to say that there are many different flavors of spring steel with varying elastic limits (which said person clearly exceeded). While installed, the x-clamp arms are limited to about 1 - 1.5mm of vertical travel. To get the heat sinks (and therefore the clamps) to move that much you'd basically have to drop the console from a considerable height (probably 12" +). Not only are the clamps well capable of handling such movement, but they are capable of handling it many times.

The individual did get the part about needing more force for the "x-clamp fix" than the x-clamps can provide themselves. Ever wonder why some systems don't last after such a "fix?" You are mashing 4 layers (GPU/CPU, GPU/CPU PCB, solder balls, and motherboard) together and in the process causing immense stress on all parts involved. It's only a matter of time before traces crack or any number of other failures.

2.) Being as the XBOX 360 does not boast an evaporative cooling system, you are actually going to need a reasonable ambient air temperature for the system fans to do their job. Microsoft specifies an operating temperature of 5°C to 35°C (41°F to 95°F). Based on what we've seen of this system's tendency to overheat, I'm going to say that 35°C (95°F) is truly 35°C (95°F). In other words, if you are running your system with an ambient temperature of 35°C (95°F) or higher, even after following the steps in this article, your XBOX 360 may still be in danger.

Further Reading

You may scoff at this, but read your User Manual. The XBOX 360 has proven to be a delicate flower, so care for it accordingly: Manuals

After all the (quite painful) internet reading I've done on this subject, I found one (1) article worth reading. It is an interview with "an individual who has worked on the Xbox 360 project for many years." The interview is not focused on preventative measures, it merely illustrates, in gross detail, why this system has had such a horrible failure rate: Interview

(Note: the interviewee and I seem to disagree on the whole vertical vs. horizontal issue. He makes the point that vertically, the system has more exposed surface area to cool, to which I respond: A.) the D panel is an indirect heat sink, at best, and B.) at the cost of the coveted ventilation of the B panel? And he was wrong about it opening more vent holes, although it does let the bottom of the motherboard breath a bit better.)

Tuesday, May 5, 2009

LOL (Lap Out Loud)

While working on the YsBox, I was interested in ways of improving the cooling scheme. The stock Dell heat sink for the main processor has a nice big slab of copper, but the surface is far from perfect. A while back I had done some reading on the process of "lapping." Lapping is merely creating a surface that is as flat as possible. Heat sinks (both discrete and integrated, integrated being those that are permanently fixed to a processor) can be lapped using tools as simple as a piece of glass and varying grits of sandpaper.

I read a hand full of guides on the subject, but I found this "how to" video to be the most comprehensive: Part 1, Part 2. After lapping, both my CPU's integrated heat sink and the main CPU heatsink (using 400-2000 grit), temperatures really didn't seem to drop (disappointing). Mechanically / theoretically it is indeed a better setup as there is much more uniform physical contact between the two parts, but apparently this CPU just doesn't get hot enough to utilize such a setup (afaik, most people who do this are overclocking their CPU's).


In the end, I'm still happy I did this process for the great learning experience.

Tuesday, April 28, 2009

Capcom Power System Changer: Back from the Grave

Don't ask me why, but there has been a resurgence of chatter about the Capcom Power System Changer. So, being as there is still some interest in this thing, that was motivation enough for me to visit my photo archive of "cool crap I've come across on Yahoo Japan Auctions." Rather than jump right into the Changer stuff, let me give you a little history.

Many folks see Capcom's CPS-2 as the product that marked the dawn of the "plastic case era" for this arcade game company. Not true. Others a bit more seasoned would recall a hand full of Capcom's CPS-1 QSound games which had plastic housings. Still not there yet. Capcom actually used plastic housings pre-QSound. The titles I'm aware of are Varth and Capcom World 2. These cases were purely for protection/aesthetics.


Shortly thereafter Capcom secured the rights to use 1Archer's proprietary QSound enhancement technology. At this point Capcom was looking at some changes to their hardware, just to support QSound, so they went ahead and designed a newfangled version of their CPS-1 product. They redesigned the housing (this time fully enclosed), complete with built in cooling fan, external 2volume control, as well as a faceplate with all the aux. connectors. In addition to that, their new electronics boasted anti-piracy technology and left/right RCA jacks for running stereo sound directly to an audio amplifier.

The titles I'm aware of in this format are Tenchi wo Kurau II, Cadillacs Kyouryuu Shin Seiki, The Punisher, Muscle Bomber, and Muscle Bomber Duo (and their respective non-Japan variants). Note that housing color does not indicate region of release, as in the case of CPS-2.

Photobucket

Capcom released their Power System Changer within a year of the last CPS-1 QSound arcade game, which leads me to believe they were working these projects in parallel.

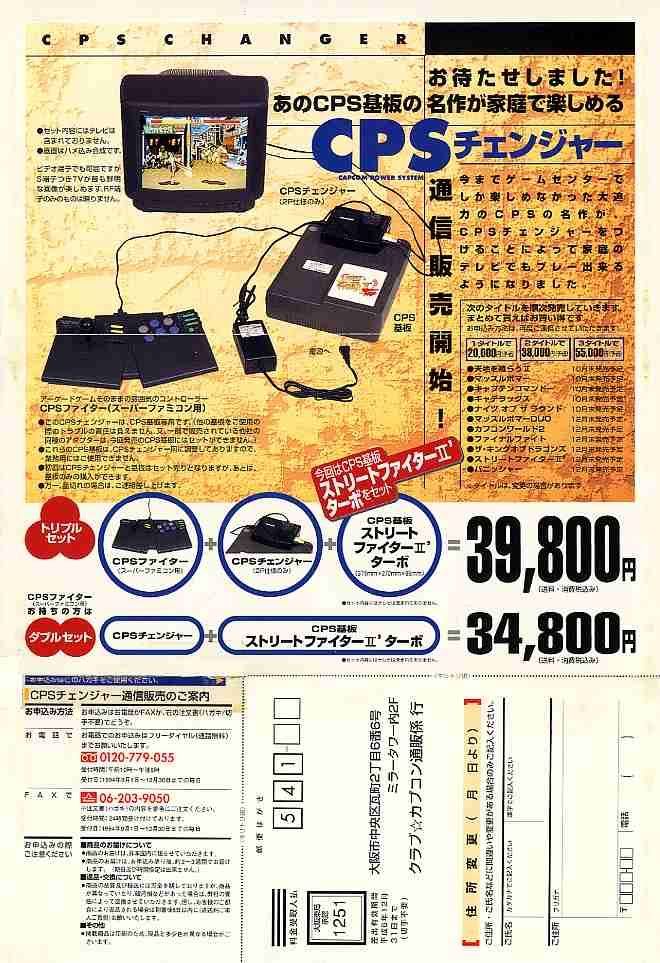
I was overjoyed when a kind soul pointed me to an official Capcom document (many thanks to Summy House) which lists the games for this system. Here is a snapshot of the list:


And here is the translation:
  • Tenchi wo Kurau II
  • Muscle Bomber
  • Captain Commando
  • Cadillacs [Kyouryuu Shin Seiki]
  • Knights of the Round
  • Muscle Bomber Duo
  • Capcom World 2
  • Final Fight
  • King of Dragons
  • Street Fighter II [Turbo]
  • Punisher
As you've probably read elsewhere, Capcom later released Street Fighter Zero. That makes for an even dozen games. I was disappointed to find that I only had photo's of 7 of the 12 titles, but this will at least wet your appetite a little for what was available:

Photobucket

Aside from the original arcade content, some (all?) of the games also had extensive options. Check out the options for Final Fight (button mapping, stage select, etc.):


As you'll read in most descriptions of the system, it makes use of the Capcom Power Stick Fighter.


For those of you not familiar with the unit, there were connections for it to be used on the Nintendo Super Famicom (above), X68000, FM Towns Marty (below), and supposedly the Sega Mega Drive.


Not as fancy as the RF (radio frequency) wireless controllers of the current generation gaming consoles, but Capcom made an IR (infrared) add-on unit which allowed you to un-tether this beastie.


For those of you on the hunt for a Changer, my best recommendation is to keep a keen eye on the arcade section of Yahoo Japan Actions. My experience has been that at least one of these pops up for auction annually. Here are a few more photos of the Changer and games with tasty packaging:


Footnotes:

1. On numerous Capcom flyers advertising QSound, a little disclaimer is included, "QSound Chips have been developed by Archer and incorporate Archer's proprietary QSound sound enhancement technology." The only Archer I could think of was the stereo equipment manufacturer that sold product through Radio Shack stores. Were they a remnant of this Archer? In my curiosity I e-mailed QSound Labs to ask them about this. They promptly replied, "The inventors vended the technology into a company called Archer Communications in 1988. In 1992, we changed the name to QSound Labs, Inc."

2. Aside from the volume dial, there is another dial close to the side. I have no idea what this was meant for, as it is unused on my Slam Masters CPS-1 game.

Links:

NFG's CPS Changer expose

Thursday, April 2, 2009

YsBox Ultra!


You may have read my YsBox article already. Well, like a good little engineer, I was thinking of ways to boost the performance/efficiency of my original design. Areas of improvement would be graphics performance and cooling efficiency.

Around the middle of my YsBox project, I found out that a low profile Nvidia 9800 GT graphics card was available from Sparkle (SX98GT512D3L-MN).


This intrigued me and I purchased one when a decent price surfaced. The power demands on this card are in the ballpark of 100W, which still leaves plenty for the rest of my box, being as I'm running a 35W processor and my power supply is capable of 280W. Cabling posed some issues, as there are no spare power connections coming out of the power supply. Rather than construct a custom cable, I wanted to see if I could come up with an "off the shelf" solution. $12 later I had a harness that would take SATA Power and split it into SATA Power and 6 Pin PCI-E Power.


Unfortunately after solving the power connector dilemma I found some mechanical conflicts. As you can see in the following 2 photo's, the 9800 GT needs to share space with the CPU heatsink shroud.


The following photo indicates (highlighted green) the areas of the CPU heatsink shroud and the 9800 GT's rear heatsink which need "adjusting."


The parts fit beautifully after this adjustment.


Being as the Dell's CPU and 9800 GT's massive heatsink are sharing the same air flow, I wanted to maximize cooling efficiency through the core of the unit. I was troubled by the location Dell chose for the hard drive. It almost completely blocks the main exhaust vent for the system fan.


Hot air from the CPU blows through this area. In leau of protecting the hard drive from this heat, Dell mounted a little blower underneath of the hard drive. Although this may be helpful, I still don't like this setup.


Toward the front of the unit, below the DVD drive, is a 3.5" bay. To my dismay, it is not a standard full depth 3.5" bay, as to allow you to simply move your hard drive down there. I did find it is deep enough to allow for some creative mounting of a 2.5" (laptop) hard drive. There are off the shelf 2.5" to 3.5" mounting kits, but they do not fit properly with Dell's "sled" system. I ended up building a custom hard drive sled and I was quite pleased with the final product. (Note: the outer screws on the sled are only partially threaded in order to slide into the chassis rails properly.)


With this neat little conversion I mounted my 2.5" hard drive comfortably out of the area of main air flow. Now the CPU and graphics card have a nice path for air to flow through the core of the system, from the front grill to the rear vents.


I am quite pleased with the final product.


Pricing:

As much as I had certain changes I really wanted to make to the YsBox, I didn't want to do anything that would take what was originally a budget savvy system and turn it into something unreachable for many folks. My upgrade from the YsBox to the YsBox Ultra ended up being about a $100 upgrade.

YsBox Ultra (what I paid, including shipping):

$111.98 - Sparkle Nvidia 9800 GT (Low profile)
$99.74 - Dell Optiplex 745 SFF, w/ DVD drive
$15.00 - Intel Celeron 2.2Ghz 35W CPU
$26.50 - 100GB Seagate 2.5" 7200RPM SATA Hard Drive
$11.95 - Misc. Power Cable Converters/Adapters
$10.44 - Accessory Kit
$275.61 - Total

The Test Drive:

dB rating for this machine is a bit higher than the ~35dB of the original YsBox (under full load, 2 feet away). I'd say it's a fair trade-off for the increase in video horse power

Rather than copy data from my previous article, I thought I'd just make note of the areas I saw noticeable improvement.

In Game Performance:
  • Ys: The Oath in Felghana:
    (Results @ 1280 x 1024 Resolution, 75 Hz, Maximum Settings, Game Difficulty Normal)

    Every part of the game is a solid 75fps (aside from momentary scene loading).

  • Ys Origin:
    (Results @ 1280 x 1024 Resolution, 75 Hz, Maximum Settings, Game Difficulty Normal)

    Every part of the game is a solid 75fps (aside from momentary scene loading).

The Linkage:

Dell
Falcom
A nice (albeit more expensive) alternative system for an YsBox is the HP Pavilion Slimline. Here is a thorough investigation/discussion of it. It's key advantages are sleek looks and smaller size (2" shorter)